今更感がありますが、JenkinsでSalesforceのCIにチャレンジ!
今回は手動デプロイ実行と、カバレッジ/テスト結果表示まで。
1. JenkinsやWebサーバ、antのインストール
まずはここから。$ apt-get update
$ apt-get install jenkins nginx ant
2. nginxの設定変更
/etc/nginx/sites-enabled/default を以下のように編集してBasic認証とJenkinsへのリバースプロキシを設定します。
server {
    listen 80 default_server;
    listen [::]:80 default_server ipv6only=on;

    root /usr/share/nginx/html;
    index index.html index.htm;

    server_name *****;

    location / {
        auth_basic_user_file /etc/nginx/.htpasswd;
        auth_basic "jenkins server";
        proxy_pass http://localhost:8080;
        proxy_set_header Authorization "";
    }
}
※ここでは非SSLの設定ですが、Basic認証使っているので絶対にSSLにした方が良いです。
→参考URL:JenkinsサーバのSSL対応とBasic認証
htpasswdの設定も忘れずに
$ apt-get install apache2-utils
$ htpasswd -c /etc/nginx/.htpasswd jenkinsuser
3. 必要なライブラリを取ってきて、$ANT_HOME/libに入れる。
以下のライブラリが必要。面倒なときはここから根こそぎ取ってきてください。
4. デプロイ対象のビルドファイルを入れる。
ここらへんは相対パスの関係で色んな配置パターンが考えられますが、以下の方針で配置しました。・jenkinsユーザのホームディレクトリを作成して、その配下にビルドファイルを入れる。
・成果物(カバレッジとテスト結果のxmlファイル)はworkspaceに置く。
ということで配置としてはこんな感じ。(ForceComSampleのファイルを置いています。)

5. build.propertiesとbuild.xmlの設定
# build.properties

sf.username = ********
sf.password = *******
sf.serverurl = https://login.salesforce.com
# build.xml
<project name="Sample usage of Salesforce-CI Ant tasks" default="deployForCI" basedir="." xmlns:sfc="antlib:com.yutagithub.sforce.ci">
    <property file="build.properties" />
    <property environment="env" />

    <!-- Build / TestResult never actually saves to the server -->
    <target name="deployForCI">
        <sfc:deployForCI username="${sf.username}" password="${sf.password}" serverurl="${sf.serverurl}" deployRoot="src" sobjectPlural="true" testResultFile="/var/lib/jenkins/workspace/Salesforce-CI/test-result.xml" coverageResultFile="/var/lib/jenkins/workspace/Salesforce-CI/coverage.xml"/>
    </target>
</project>
testResultFileとcoverageResultFileはworkspace直下に設定します。
カバレッジやテストレポートはworkspaceからの相対パスで指定するっぽいのでこの場所に置いてます。
あと、sfc:deployForCIはant-salesforceのdeployを拡張したものなので
checkOnly=“true"でデプロイをせずテストのみ行うことも可能です。
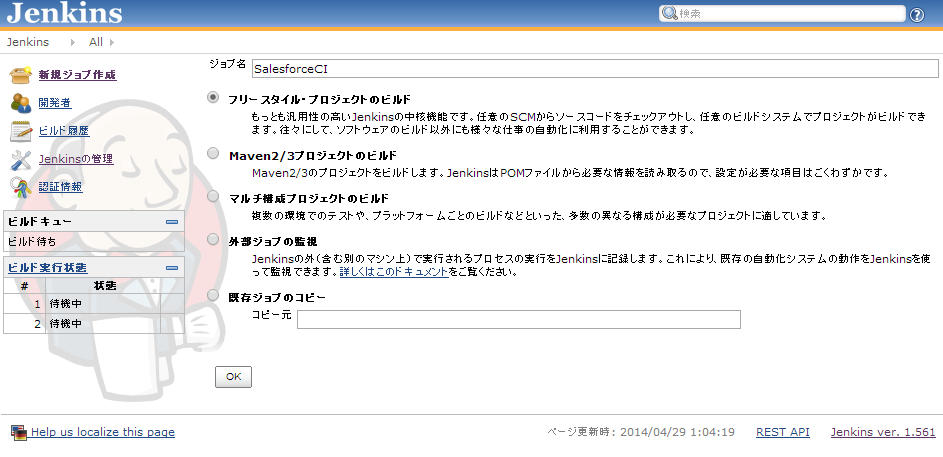
6. jenkinsの設定
http://{your domain}/でjenkinsにアクセスしてJenkinsの管理>プラグインの管理からCobertura Pluginをインストール後、新規ジョブを作成します。
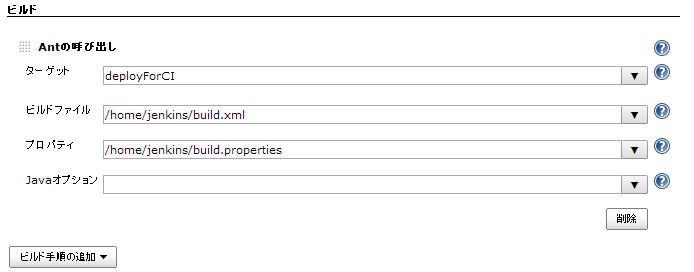
ビルドの設定
ビルド後の処理

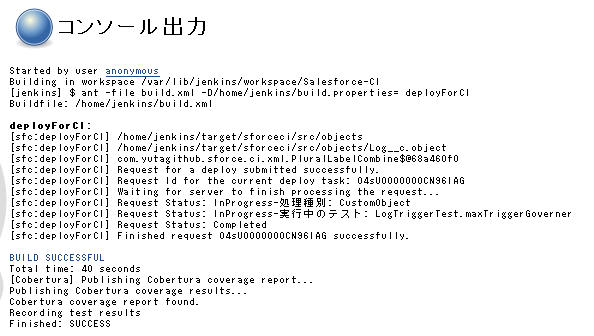
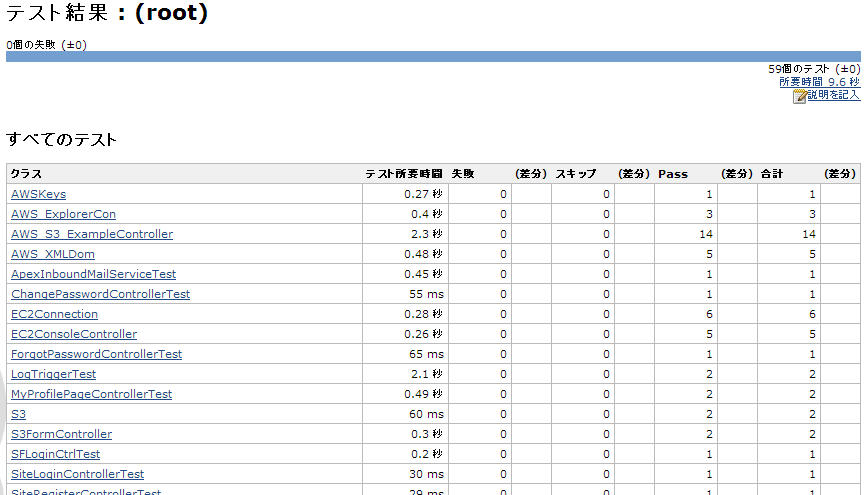
7. ビルドを実行してカバレッジとテスト実行結果を取得!
実行結果はこんな感じ。コンソール出力
カバレッジ(何かグラフの凡例が…)

カバレッジ詳細

テスト実行結果
パスの設定がおかしいと、
[Cobertura] No coverage results were found using the pattern****
と言われるので注意してください。
※coverage.xmlとtest-result.xmlがファイルシステム上のどこにも出力されていなければ
3のライブラリ設定がおかしい可能性があります。
出力されていて、上記エラーが出た場合は完全にパス設定の問題です。
ということで、Salesforceのコードを手動でデプロイして実行結果を取得できることができました!
次回は、bitbucketと連携したいと思います。